
1. Restore to Default Settings
The following process will restore your program back to initial settings like the first time you installed the program. This can often resolve any performance issues, exceptions, or errors.
What will be lost:
- Custom font and color settings
- Chart templates
- AutoX plugin settings
- Default order settings
- Trade confirmation and notifications settings
- Risk monitor settings
What will not be impacted:
- Workspace files
- Custom indicators or strategies written in C#, NinjaScript, or EasyLanguage.
Instructions:
- Go to the File menu in the main platform window.
- Next, go to Global Settings and select Restore to Default.
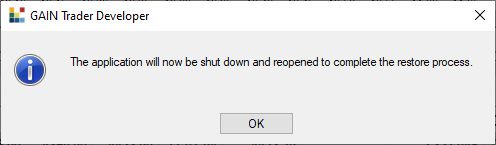
- Press OK.
- The program will close and reopen.
2. Restore Default Toolbar
Right-click on the title bar of the window for the toolbar you want to change back to the default. Then, go to Configure, click Restore Default.

3. Resting Order Specs for GAIN Trader / StoneX Futures Trader
The following table explains which type of order will rest server-side (exchange or StoneX) and what will rest client-side:
- NOT-HELD: The order type is not an exchange supported order type and therefore will be worked on a “Not-Held” basis. In other words, the order will be held on StoneX’s server until the order parameters have been met, then released to the exchange. You understand that technical problems or other conditions may delay or prevent StoneX from executing this order type, which you shall not hold StoneX liable for.
- Held at exchange: The order will remain working should you disconnect, provided there are no technical issues.
- Local/Client-side: The order relies on an active connection to our order server. The order may not remain in a working state if you lose connection, whether intentional or unintentional, such as power/internet outage, intermittent connectivity, etc.
NOT-HELD (StoneX):
- Orders using Order Entry Ticket
- Standard:
- Market if Touched – held on StoneX server until price is triggered
- Market on Open – only regular session supported, no Holiday or restricted sessions
- Market on Close – only regular session supported, no Holiday or restricted sessions
- Trailing Stop (including Tr. Stop Limit) – held on StoneX until price is triggered
- Time-release – held on StoneX server until time has been reached
- Cancel-release – held on StoneX server until time has been reached, then order will be canceled
- Standard:
-
- OSO – when main order is working at the exchange, the contingent order(s) are held on StoneX server until the main order is filled)
- OCO – both orders are working at the exchange, but contingent cancel request is maintained at StoneX until one side is triggered
- Chart – Trade Mode orders
- Bracket – when main order is working at the exchange, the contingent order(s) are held at StoneX until the main order is filled)
- Market If Touched – held on StoneX server until price is triggered
- OCO – use CTRL key to place – both orders are working at the exchange, but contingent cancel request is maintained at StoneX until one side is triggered
- Trailing Stop (including Tr. Stop Limit) – held on StoneX until price is triggered
- Time-release – held on StoneX server until time has been reached
- Cancel-release – held on StoneX server until time has been reached, then order will be canceled
- Strategy (Multi-Bracket) – if the setting is set to server-side, orders are working at the exchange, but contingent cancel request is maintained at StoneX until one side is triggered
- DOM
- OSO – when main order is working at the exchange, the contingent order(s) are held on the StoneX server until the main order is filled)
- OCO – both orders are working at the exchange, but contingent cancel request is maintained at StoneX until one side is triggered
- Market if Touched – held on StoneX server until the price is triggered
- Trailing Stop (including Tr. Stop Lmt.) – held on StoneX until the price is triggered
- Time-release – held on StoneX server until time has been reached
- Cancel-release – held on StoneX server until time has been reached, then the order will be canceled
- Strategy (Multi-Bracket) – if the setting is set to server-side, orders are working at the exchange, but contingent cancel request is maintained at StoneX until one side is triggered
Held at Exchange
- Orders using Order Entry Ticket
- Standard – Market, Limit, Stop, Stop Limit, Iceberg
- Complex – Futures Spreads
- Chart – Trade Mode orders
- Standard orders – Market, Limit, Stop, Stop Limit, Iceberg
- DOM
- Standard orders – Market, Limit, Stop, Stop Limit, Iceberg
Local/Client-side
- Chart
- Strategy (Multi-Bracket) – if setting is set to client-side, held locally for full duration of order
- Trading Strategy Manager – the platform must remain connected for the full duration that the strategy is running
- DOM
- Strategy (Multi-Bracket) – if the setting is set to client-side, held locally for the full duration of the order
- Break-Out Bracket – initial part of the order is held locally, once buy or sell bracket is triggered, the order is held on StoneX server as a bracket order
- Scheduled Orders – located in Trading menu
- Risk Monitor – located in Trading menu
4. How do I access my account statement?
Login at https://myaccount.gainfutures.com/If you do not recall your password, click on the ‘Forgot your password’ link. If you do not recall your username, contact your Introducing Broker for assistance.
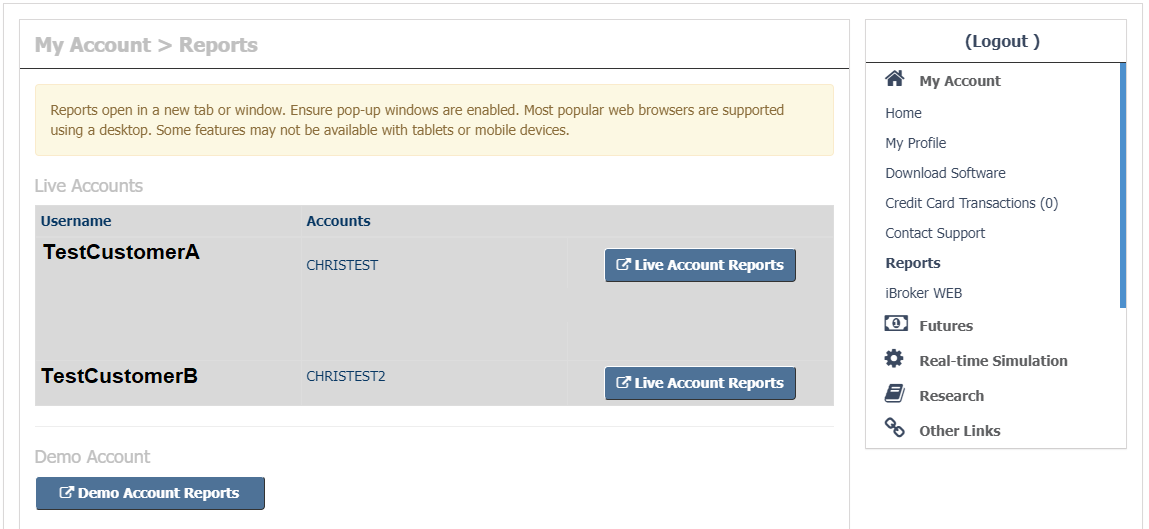
Once logged in, click on Reports. If you have more than one Report portal login, you will see more than one ‘Live Account Report’ button. Click on the button for the account you need to access reports or statements.
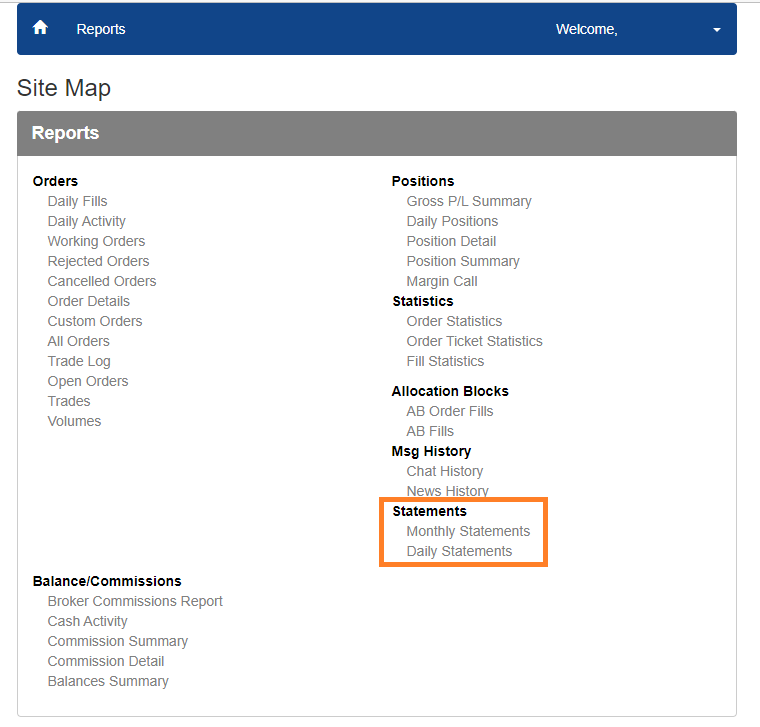
A pop-up window will appear, click on the Daily or Monthly statement option:
5. I’m seeing a message “Data Feed Not Entitled,” what does this mean?
If you pull up a symbol in our Quote Board, Chart or DOM and do not have a market data subscription to the respective exchange, you will see a dialog window like the following appear:


To sign up for market data, go to https://myaccount.gainfutures.com/MarketData and login. Review and accept the Market Data Terms. Then, choose which exchange to subscribe to, billing method, and follow the screen prompts. If you’re not sure which contract belongs to what exchange, review at: https://gainfutures.com/specifications/?by=Exchange.
For pricing, go to https://gainfutures.com/market-data-pricing/.
6. The bars on the chart are missing or not within ordinary scale. How can I fix?
You may have a drawing object that was added to your chart when viewing a different market or different expiration.Example:
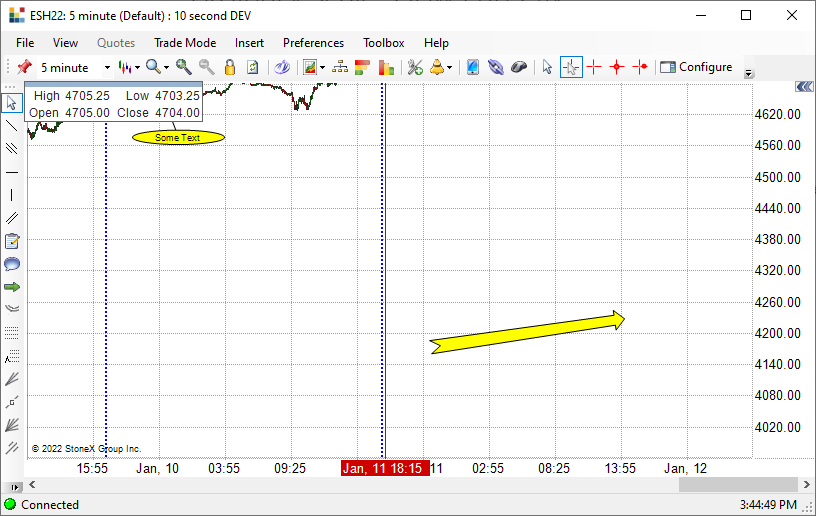
To remove the object, click on the “Object List” icon on the left chart toolbar. Then, remove the object.

Left-click on the object and click Remove, or click Remove All.

If that did not help, right-click in the chart and go to View > Auto Min / Max Price. This will reset your chart back to Automatic scaling.

7. How do I change my chart to regular trading hours (or a custom time period)?
There are two ways to change filter visible bars in charts:
- Double left-click on the wicks of a candle chart (or bars for OHLC chart) to pull up chart properties. In this pop-up window, locate Misc > Session. Select ‘Custom’ timeframe and enter your desired start and stop time.
- Right-click in the chart and go to Configure. Next, left-click the drop-down list that appears to the left of the double blue arrows. Select the futures contract symbol in the list. Below the drop-down list, scroll to the bottom of the Settings window and locate Misc > Session. Select ‘Custom’ timeframe and enter your desired start and stop time.

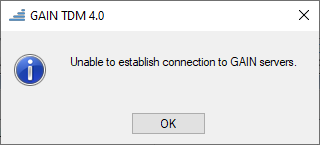
8. What ports are used? I’m seeing a message “unable to establish connection…?”
The error message “unable to establish connection…” could occur due to many reasons:
1. Your firewall or other security software is blocking our platform from connecting to our servers. Please add a rule in your firewall software to give permissions.
- Select the Start menu, type Allow an app through Windows Firewall, and select it from the list of results.
- Select Change settings. You might be asked for an administrator password or to confirm your choice.
- To add an app, select the check box next to the app, or select Allow another app and enter the path for the app.
If your firewall program is not Windows Firewall, please contact the software manufacturer for assistance.
2. The internet connection is currently down. Please check your modem lights and ensure you are connected. Try powering down the modem and any routers and plug them back in after 30 seconds. If using a dial-up connection, ensure you are connected while installing our software.
3. You are behind a corporate firewall and will be unable to use our trading software as we require TCP ports 9210 and 9211 to be open. Contact your IT department to see if arrangements can be made to open these ports.
4. It could be a DNS problem with your internet provider. First, try flushing DNS cache, details here: https://support.opendns.com/hc/en-us/articles/227988627-How-to-clear-the-DNS-Cache-on-a-computer-and-web-browsers.
Next, check if our production website (https://prod.gainfutures.com) accessible. If the site is not accessible, this may be due to your provider having routing issues. A workaround is using OpenDNS as a DNS provider. This does not change who your internet provider is, just changes how domain names are resolved into IP addresses. There is no cost for this service.
To setup, follow these instructions: https://store.opendns.com/setup/#/
9. Troubleshooting your internet connection
In order to troubleshoot your connection, you can perform a PING test on servers just in front of our servers and perform a TRACEROUTE to our trading servers.
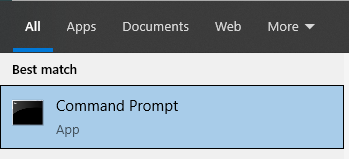
1. PING TEST
Open a command prompt window by going to the Windows start button and type CMD.

Then, click on the result:
Type in the command:
ping api.gainfutures.com -n 100
This will test your response time to our data center. Review the results:
Ping statistics for api.gainfutures.com:
Packets: Sent = 100, Received = 100, Lost = 0 (0% loss),
Approximate round trip times in milli-seconds:
Minimum = 29ms, Maximum = 57ms, Average = 31ms
Any lost packets mean your connection is impaired and your experience with us might not be ideal. You may want to notify your internet provider to see if your modem or line needs servicing. If your average time is more than 500ms, your data broadcasted is a half-second behind the actual time.
2. TRACEROUTE TEST
With the command prompt still open, type in the command:
tracert prod.gainfutures.com
Result:
Tracing route to td-prod-gainfutures-com.trafficmanager.net [66.76.151.30]
over a maximum of 30 hops:

1  1 ms  2 ms <1 ms    router.asus.com [192.168.2.1]
2  2 ms  1 ms  1 ms    192.168.1.254
3 29 ms 21 ms 20 ms    x-x-x-1.lightspeed.clmboh.sbcglobal.net [x.x.x.1]
4 * * * Request timed out.
5 31 ms 30 ms 30 ms    x.x.x.x
6 33 ms 31 ms 30 ms    cgcil403igs.ip.att.net [12.122.133.33]
7 30 ms 30 ms 29 ms    be3039.ccr41.ord03.atlas.cogentco.com [154.54.12.85]
8 32 ms 35 ms 38 ms    38.88.205.122
9 30 ms 29 ms 30 ms    173-219-221-161.suddenlink.net [173.219.221.161]
The number of hops will increase the chance of issues as your connection is reliant on more parties to route you to our servers. Anything over 15 hops is not ideal and may cause latency. Any hop with more than 500 ms is not ideal and may cause prices or orders to be lagged. You might see some hops with “request timed out,” as shown in hop 4. This is ok, it just means the switch is not pingable.
10. Getting a critical error report?
There may be occasions where some action results in a critical error. Oftentimes, clicking Send Error Report will allow you to continue with no major hindrance. Close the program down by clicking on Exit program. Then, reopen the program. If you see an update available, perform the update. If you encounter the error again, here are steps you can follow to allow us to escalate the issue.
When you see the screen click on the HERE link, like below:
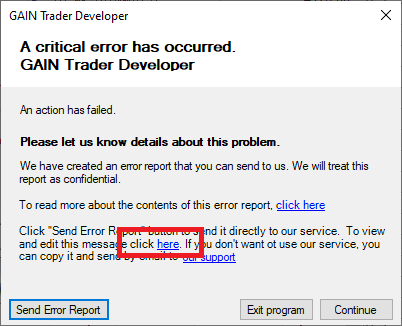
Then, copy all of the text below and email it to us. If you can, let us know the steps to reproduce the matter.

Electronically submitted error reports will be reviewed when we see many cases. One case of an error may not justify an automatic review from our development team.
11. Restore to Default Settings – GAIN Trader
1. Shut down our program.
2. Open the appdata folder.
Windows 7 – Click on Windows Start button and search %APPDATA%
Windows 8 – Click on Windows logo button on your keyboard and search %APPDATA%
Windows 10 – In the search box, next to the Windows Start button, type in %APPDATA%
Click on the search result, it usually will display a folder icon and maybe named Roaming.

3. Navigate to the GAIN Trader folder.
If steps 1 through 3 are not possible, you can manually go to the direct folder.
C:\Users\*username*\AppData\Roaming\GAIN\GAIN Trader\Prod (or Demo)
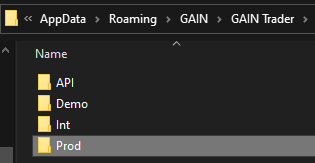
Open the Prod folder for the live platform) or Demo folder for the demo/simulator, see below.
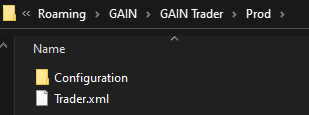
4. Delete or rename the file named Trader.XML. Renaming the file is recommended in case you need to import at a later time. Deleting the file will lose some personal settings. Workspaces files and custom indicators or strategies are not impacted by this change.
Note: You can rename the Configuration folder if going this method does not resolve your issue.
5. Reopen the program. The username field will most likely be blank. You will see the default workspace and all personal settings will revert to the default.
12. Restore to Default Settings – GAIN TDM
1. Shut down our program.
2. Open the appdata folder.
Windows 7 – Click on Windows Start button and search %APPDATA%
Windows 8 – Click on Windows logo button on your keyboard and search %APPDATA%
Windows 10 – In the search box, next to the Windows Start button, type in %APPDATA%
Click on the search result, it usually will display a folder icon and maybe named Roaming.
3. Navigate to the GAIN TDM folder.
If steps 1 through 3 are not possible, you can manually go to the direct folder.
C:\Users\*username*\AppData\Roaming\GAIN\GAIN TDM\Prod (or Demo)
Open the Prod folder for the live platform) or Demo folder for the demo/simulator, see below.
4. Delete or rename the file named Trader.XML. Renaming the file is recommended in case you need to import at a later time. Deleting the file will lose some personal settings. Workspaces files and custom indicators or strategies are not impacted by this change.
Note: You can rename the Configuration folder if going this method does not resolve your issue.
5. Reopen the program. The username field will most likely be blank. You will see the default workspace and all personal settings will revert to the default.
13. Restore to Default Settings – StoneX Futures Trader
1. Shut down our program.
2. Open the appdata folder.
Windows 7 – Click on Windows Start button and search %APPDATA%
Windows 8 – Click on Windows logo button on your keyboard and search %APPDATA%
Windows 10 – In the search box, next to the Windows Start button, type in %APPDATA%
Click on the search result, it usually will display a folder icon and maybe named Roaming.
3. Navigate to the StoneX Futures Trader folder.
If steps 1 through 3 are not possible, you can manually go to the direct folder.
C:\Users\*username*\AppData\Roaming\StoneX\StoneX Futures Trader\Prod (or Demo)
Open the Prod folder for the live platform) or Demo folder for the demo/simulator, see below.
4. Delete or rename the file named Trader.XML. Renaming the file is recommended in case you need to import at a later time. Deleting the file will lose some personal settings. Workspaces files and custom indicators or strategies are not impacted by this change.
Note: You can rename the Configuration folder if going this method does not resolve your issue.
5. Reopen the program. The username field will most likely be blank. You will see the default workspace and all personal settings will revert to the default.
14. Restore to Default Settings – DT Pro
1. Shut down our program.
2. Open the appdata folder.
Windows 7 – Click on Windows Start button and search %APPDATA%
Windows 8 – Click on Windows logo button on your keyboard and search %APPDATA%
Windows 10 – In the search box, next to the Windows Start button, type in %APPDATA%
Click on the search result, it usually will display a folder icon and maybe named Roaming.
3. Navigate to the DT Pro folder.
If steps 1 through 3 are not possible, you can manually go to the direct folder.
C:\Users\*username*\AppData\Roaming\Daniels\DT Pro\Prod (or Demo)
Open the Prod folder for the live platform) or Demo folder for the demo/simulator, see below.
4. Delete or rename the file named Trader.XML. Renaming the file is recommended in case you need to import at a later time. Deleting the file will lose some personal settings. Workspaces files and custom indicators or strategies are not impacted by this change.
Note: You can rename the Configuration folder if going this method does not resolve your issue.
5. Reopen the program. The username field will most likely be blank. You will see the default workspace and all personal settings will revert to the default.
15. Remove CFRN indicators and install fresh version
- Shut down and exit the trading platform
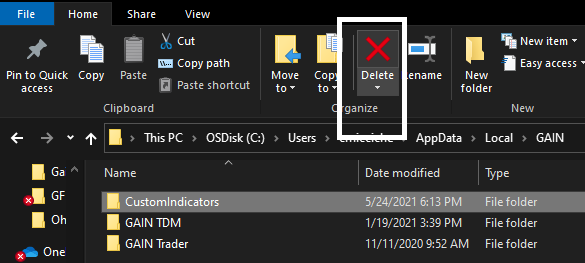
- Delete any .CILIB files from C:\Users\ windows_user_name\Documents\My Indicators and Strategies

- Delete the folder CustomIndicators from C:\Users\windows_user_name\AppData\Local\GAIN
- Reopen the platform
- Install the new package from the Indicator Store
- Close the platform and reopen the platform
Indicators will now be installed with a fresh version. All instances of older versions were removed with the steps above.